Create New Patient Encounter
A Patient Encounter includes an Encounter Form, which consists of one or more Encounter pages, each of which contains one or more Encounter Elements.
Encounter Elements and Encounter Forms are defined in the Encounter Manager module. For more information, click here.
- Step-by-step
- Edit Patient Information on-the-fly
- Save the Patient Encounter
- Sign Off Patient Encounter
- Lock Patient Encounter
- Delete the Patient Encounter
- Related topics
Step-by-step
To create a new Patient Encounter, you must first find and select a patient. For help, click here.
- After selecting a patient, do one of the following:
- Click New Encounter in the Shortcuts list.
- Select New Encounter from the Common Tasks menu.
- Select New Encounter from the expanded Encounters tree in the Patient Navigation list.
- The Encounter Types popup displays on top of the View Patient Record window. The Select an Encounter Type drop-down list is active.
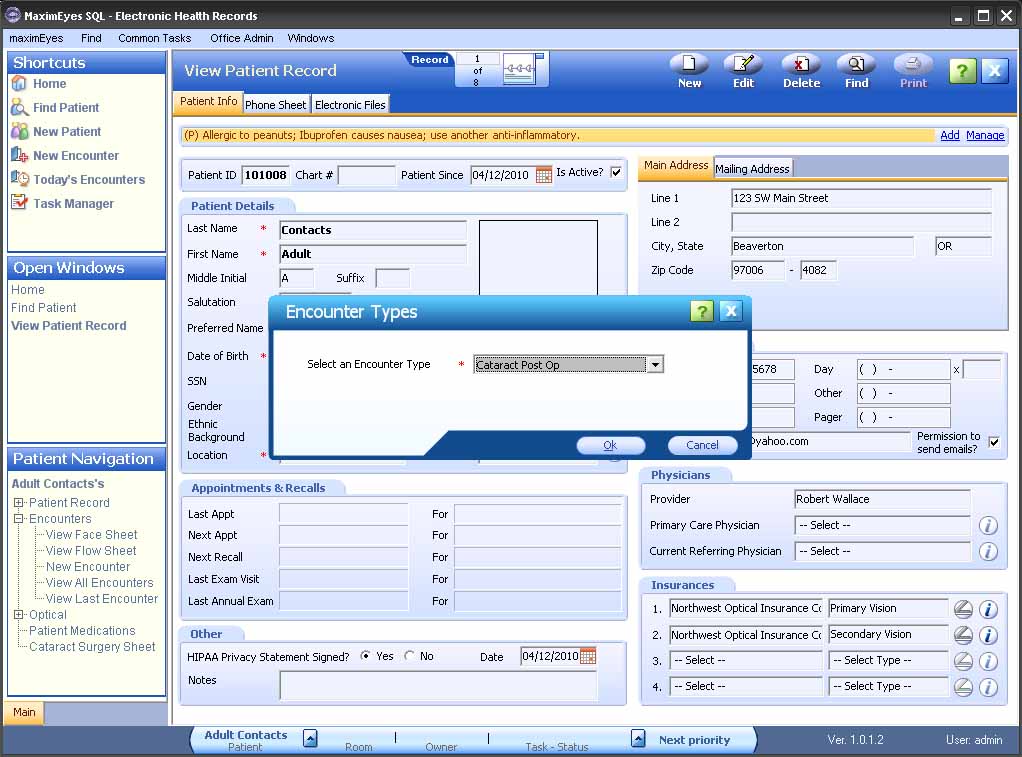
- Using the mouse or Up/Down arrow keys, select the desired type for the Encounter you wish to create.
- Click the OK button.
To close the popup without creating a new Encounter, click the Close button in the upper-right corner or click the Cancel button at the bottom of the popup.
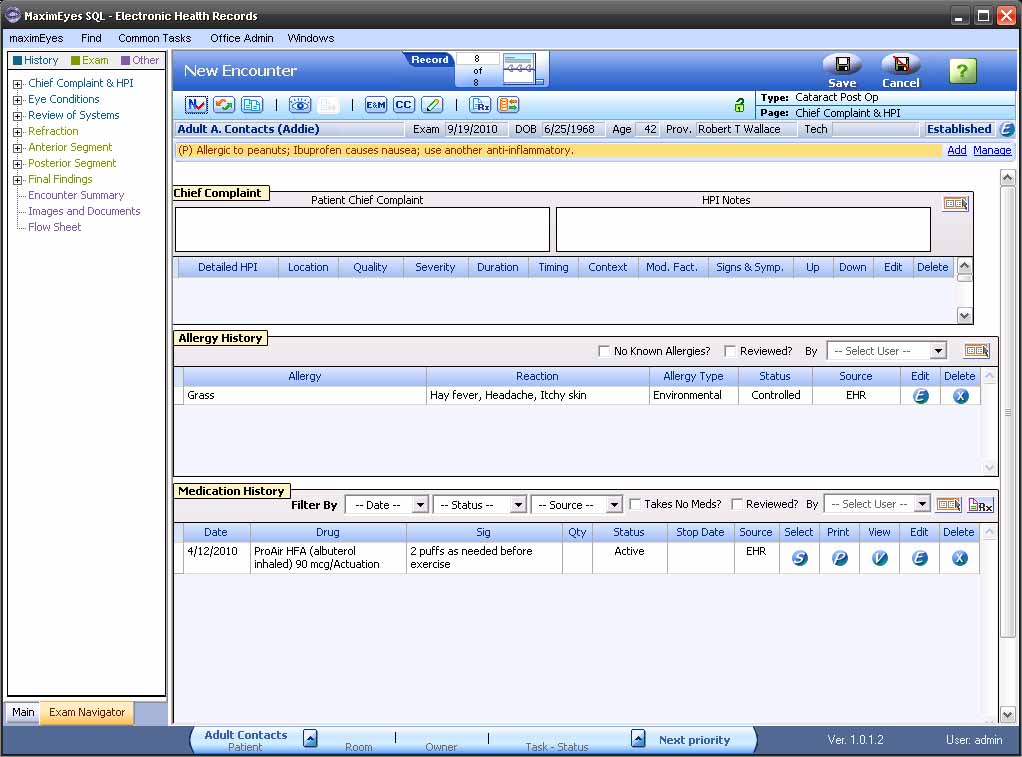
- The New Encounter window displays.
- The first page of the Encounter form for the selected Encounter type displays in the Contents Pane.
- The Exam Navigator displays in the Left Pane.
- The Status Bar at the bottom of the window displays the Task Manager.
- The Secondary toolbar, general patient information and patient Alerts (if any) display below the Main toolbar.
- The Type field in the Secondary toolbar displays the Encounter Type name.
- The Page field in the Secondary toolbar displays the name of the displayed page.
- The Record Browser Rolodex updates the count of Encounters associated with the selected patient. This number includes the Encounter being created.
- As desired, fill in the Elements of each Encounter page displayed in the Exam Navigator.
- For information on key Elements and Features of a Patient Encounter, click here.
- For help on inputting Element data, click here.
- For a list of those Encounter Elements that have special functionality associated with them (listed by the Encounter page on which they appear), click here.
- For a description of a new Patient Encounter, click here.
- For help on navigating to an Encounter form page, click here.
Edit Patient Information on-the-fly
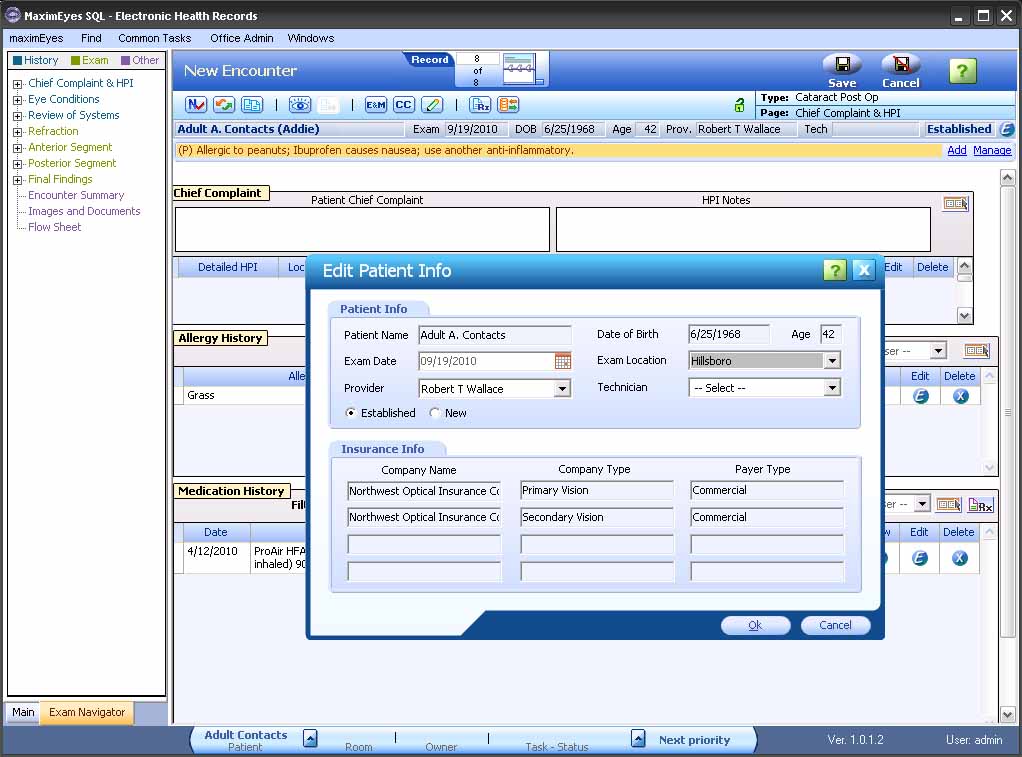
To quickly edit basic patient information and patient insurance information, click the Edit button  in the Secondary toolbar to the right of the Established field.
- The Edit Patient Info popup displays.
- The Exam Location field is active.
Using the mouse or Tab key, move through the fields and make changes as desired.
- Click the OK button to close the popup and save changes.
- Click the Cancel button to close the popup without saving changes.
Save the Patient Encounter
After all Encounter Pages have been completed, click the Save button on the Main toolbar to save it. The View Encounter window displays the newly-created Patient Encounter.
To close the New Encounter window without creating a new Patient Encounter, click the Cancel button on the Main toolbar.
- If changes have been made, a warning displays. Click the Yes button to lose changes and continue.
- If a letter has been generated from the Encounter, the Encounter cannot be cancelled (it must be saved).
- If E-Prescribe was used as part of the Encounter, the Encounter cannot be cancelled (it must be saved).
Sign Off Patient Encounter
For complete information on signing off a Patient Encounter, including Requirements, click here.
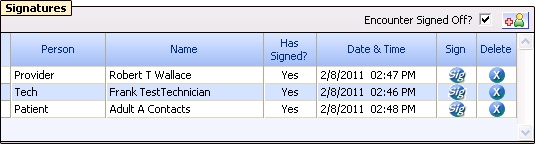
- In the Exam Navigator, expand the Final Findings page to displays its Elements.
- Select the Signatures Element.
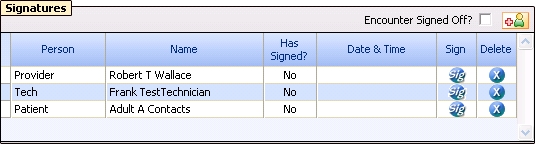
- For the person whose signature you wish to add to the Encounter, click the Signature button.

- The Enter Signature popup displays.
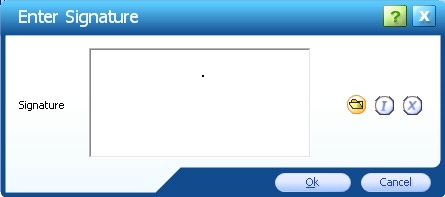
- Enter the Signature and click the OK button.
- The Enter Signature popup closes.
- The Has Signed? field updates to Yes for the signature that was entered.
- The Date & Time field updates to the MM/DD/YY and time the Signature was entered.
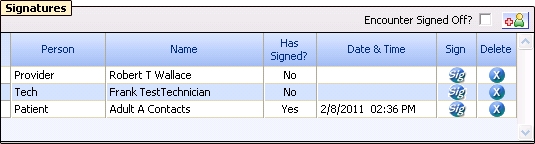
Note: Once the Signature has been entered, any change to the Provider or Tech name on the Encounter does not change these names in the Signature Element.
When a Provider adds his/her signature
- The Encounter Signed off check box is checked.
- By default, the Element populates with the Provider for the Encounter.
Note: A Tech or Staff may sign off on behalf of the Provider by entering the Signature authentication password that has been set up in the Office Admin Users module.
Lock Patient Encounter
An Encounter must be signed off before it can be Locked. If a user tries to Lock an Encounter before it is signed off, a warning displays.
- In the Secondary toolbar, click the Lock Encounter icon
 .
.
If the Encounter has not been signed off, an error message displays.
- If the Encounter has been signed off:
- The View Encounter window displays.
- The Lock icon in the Secondary toolbar updates to display the Encounter as locked.
- In the Patient Encounters tab of the Encounters window for the patient, the Is Locked? column for the locked Encounter displays Yes.
Note: Once an Encounter is locked, it cannot be modified.
For more information, click here.
Delete the Patient Encounter
To delete a Patient Encounter, do one of the following:
- From the Encounters window of the selected patient, click the Delete button
 on the row of the Patient Encounters tab for the Encounter you wish to delete.
- From the View Encounter window for the selected Encounter, click the Delete button in the Main toolbar.
A warning displays, asking you to confirm the deletion.
- Click the Yes button to confirm.
- The Encounter no longer displays on the View All Encounters window for the patient.
Note: The following types of Patient Encounters cannot be deleted:
- A Locked Encounter.
- An Encounter that has been transferred to a practice management software program, such as MaximEyes® Practice Management System (PMS).
 Top of Page