Element-Specific Features
Following is a list of those Encounter Elements that have special functionality associated with them. Elements are listed under the Patient Encounter page on which they are found:
View an Element
To view a screen shot of the Element, click the Element name to display it in a new browser window, which can be resized for optimal viewing.
Chief Complaint & HPI page
| Element |
Description |
|
Allergy History
|
Use this Element to record any allergies the patient may have. The User can also indicate that the patient has No Known Allergies, as well as indicate which User has reviewed the allergy history.
- Allergies are entered via the Data Entry screen.
- MaximEyes® SQL automatically copies forward the Allergy History Element from the previous Patient Encounter to the current Patient Encounter.
|
|
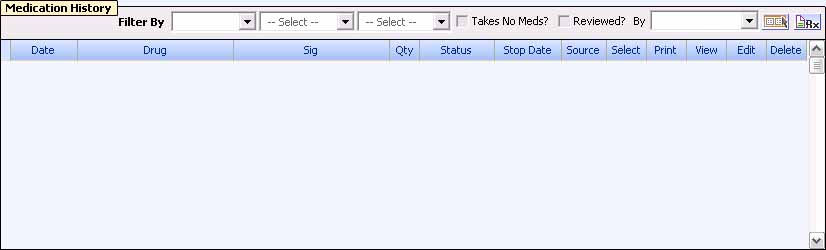
Medication History
|
Use this Element to record any medications that the patient has taken in the past. The User can also indicate that the patient has not taken any medications in the past, as well as indicate which User has reviewed the medication history. Medications in the Element can be filtered by Date, Status and Source.
- Medications are entered via the Data Entry screen.
- MaximEyes SQL automatically copies forward the Medication History Element from the previous Patient Encounter to the current Patient Encounter.
|
[Top of Page]
Medical History Summary page
All Summary Elements have a Refresh icon  in the upper-right corner of the Element. Click this icon to retrieve the summary data for that Element.
Edit Encounter window only: Hover the mouse over the Element data area to display the Full View of an Element.
| Element |
Description |
|
Chief Complaint Summary
|
Shows the Patient Complaint Details and Extended HPI fields from the Chief Complaint Element. The User cannot edit this data.
|
|
Allergy History Summary
|
Shows a summary of the data entered on the Allergy History Element. The User cannot edit this data.
|
|
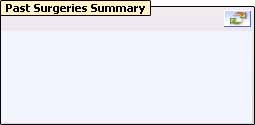
Past Surgeries Summary
|
Shows a summary of the data entered on the Past Surgeries Element. The User cannot edit this data.
|
|
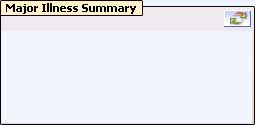
Major Illness Summary
|
Shows a summary of the data entered on the Major Illness Element. The User cannot edit this data.
|
|
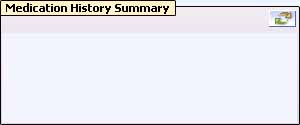
Medication History Summary
|
Shows a summary of the data entered on the Medication History Element. The User cannot edit this data.
|
|
Eye Diseases Summary |
Shows a summary of the data entered on the Eye Diseases Element. The User cannot edit this data.
|
|
Current Eye Symptoms Summary
|
Shows a summary of the data entered on the Current Eye Symptoms Element. The User cannot edit this data.
|
|
Review of Systems Summary
|
Shows a summary of the data entered on the Review of Systems - Brief OR Review of Systems - Detailed Element. The User cannot edit this data.
|
|
Family History Summary
|
Shows a summary of the data entered on the Family History Element. The User cannot edit this data.
|
|
Social History Summary
|
Shows a summary of the data entered on the Social History - General, Social History - Vision, Social History - Spectacles and Social History - Contact Lens Elements. The User cannot edit this data.
|
[Top of Page]
Preliminaries Page
| Element |
Description |
|
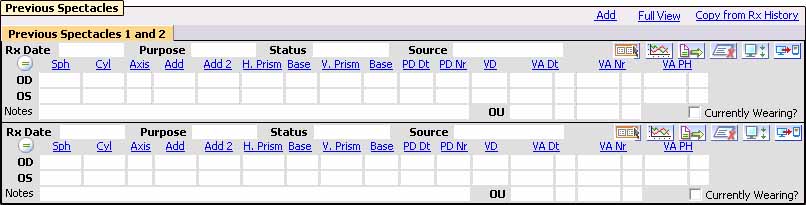
Previous Spectacles
|
Use this Element to store Previous Spectacle data for the patient. There is no limit on the number of Previous Spectacles that can be stored; however, only two Previous Spectacles can be viewed at a time (per tab).
- Add link: Click to create a new tab and enter more Previous Spectacle data.
- Full View link: Click to open a popup window that displays all the Previous Spectacles.
- Copy from Rx History link: Click to open a popup window listing all the Final Spectacle prescriptions for the patient. The User can select multiple prescriptions to copy into the Previous Spectacles Element.
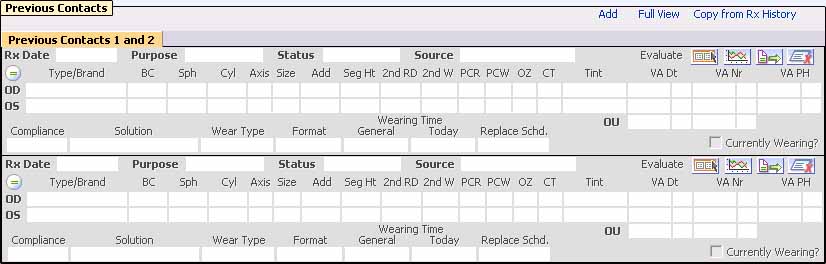
- Graph:
 Click to open a popup window displaying a graph of all visual acuity data entered in the Previous Spectacles Element for this patient (past and current Encounters). The displayed data can be filtered by Encounter date and VA Value. Click to open a popup window displaying a graph of all visual acuity data entered in the Previous Spectacles Element for this patient (past and current Encounters). The displayed data can be filtered by Encounter date and VA Value.
- Copy Data To:
 Click to open a menu and select where to copy data from the particular Previous Spectacle. Click to open a menu and select where to copy data from the particular Previous Spectacle.
- Clear Data:
 Click to clear all data from the Previous Spectacle section. Click to clear all data from the Previous Spectacle section.
- Import Data from Equipment:
 Click to import any unprocessed equipment data. For more information, see MaximEyes® Equipment Interface (MEI). Click to import any unprocessed equipment data. For more information, see MaximEyes® Equipment Interface (MEI).
- Currently Wearing? (check box):
 Click to mark the selected Previous Spectacle as the Currently Wearing spectacle. The Visual Acuity data entered in this section is automatically copied to the Spectacles VA Element (if present on the form). Additionally, the Currently Wearing Spectacles Element shows data from this Previous Spectacle section. Click to mark the selected Previous Spectacle as the Currently Wearing spectacle. The Visual Acuity data entered in this section is automatically copied to the Spectacles VA Element (if present on the form). Additionally, the Currently Wearing Spectacles Element shows data from this Previous Spectacle section.
Note: Only one Previous Spectacle can be marked as Currently Wearing.
|
|
Previous Spectacles - Brief
|
This Element has the same functionality as the Previous Spectacles Element, except data for only one Previous Spectacle is displayed per tab.
Note: A Patient Encounter form may have either the Previous Spectacles OR Previous Spectacles - Brief Element, but it cannot have both.
|
|
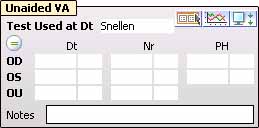
Unaided VA
|
- Graph: Click to plot current and past Patient Encounter data on a graph. For more information, see Encounter Graphs.
- Import Data from Equipment: Click to import any unprocessed equipment data. For more information, see MaximEyes Equipment Interface (MEI).
|
|
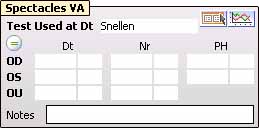
Spectacles VA
|
This Element is auto-populated with data marked as the Currently Wearing from the Previous Spectacles OR Previous Spectacles - Brief Elements.
Note: If the user changes data in the Spectacles VA Element, data in the Previous Spectacles Element is not changed.
- Graph: Click to plot current and past Patient Encounter data on a graph. For more information, see Encounter Graphs.
|
|
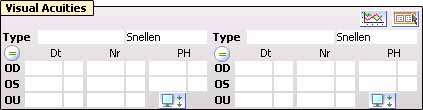
Visual Acuities
|
The User may select to use the Visual Acuities Element instead of the separate Unaided VA, Spectacles VA and CL VA Elements.
Note: If the Visual Acuities Element is selected, the user must specify the Type of Visual Acuity (Aided, Unaided, etc.).
Note: There is no dependency between the Previous Spectacles = Currently Wearing section and this Element.
- Graph: Click to plot current and past Patient Encounter data on a graph. For more information, see Encounter Graphs.
- Import Data from Equipment: Click to import any unprocessed equipment data. For more information, see MaximEyes Equipment Interface (MEI).
|
|
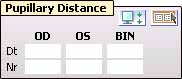
Pupillary Distance
|
The BIN fields auto-calculate the sum of the values entered in the OD and OS fields.
|
|
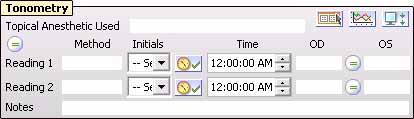
Tonometry
|
Use this Element to enter two tonometry readings for the patient. The Initials field auto-populates with the initials of the user logged in.
- Enter Current Time:
 Click these icons to automatically enter the current time. Click these icons to automatically enter the current time.
- Graph: Click to plot current and past Patient Encounter data on a graph. For more information, see Encounter Graphs.
- Import Data from Equipment: Click to import any unprocessed equipment data. For more information, see MaximEyes Equipment Interface (MEI).
|
|
Screening Fields
|
This Element's Data Entry screen is different than the Data Entry screen for entering Notes. The User must select the Condition and (optionally) a Qualifier, and then click the Add to Notes button  to append it to the Notes field. to append it to the Notes field.
Note: This can be done multiple times, as the Notes field is created by appending all these values together.
|
|
Cover Test
|
This Element's Data Entry screen is different than the Data Entry screen for entering Results. After selecting the At, Amount, Frequency, Eye and Deviation values, the user must click the Add Result button  to append it to the Results field. to append it to the Results field.
Note: This can be done multiple times, as the Results field is created by appending all these values together.
|
|
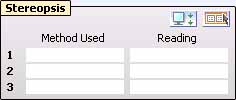
Stereopsis
|
Import Data from Equipment: Click to import any unprocessed equipment data. For more information, see MaximEyes Equipment Interface (MEI).
|
|
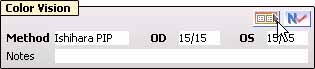
Color Vision
|
This Element's Data Entry screen allows for separate OD and OS values. For each, the user must select the Plates Correct and the Plates Asked values. This data is displayed as Plates Correct/Plates Asked in the OD and OS fields.
|
|
Blood Pressure
|
- Enter Current Time: Click to automatically enter the current time.
- Graph: Click to plot current and past Patient Encounter data on a graph. For more information, see Encounter Graphs.
|
[Top of Page]
Refraction Page
| Element |
Description |
Currently Wearing Spectacles
(view-only)
|
This Element displays the Previous Spectacle data that was marked by the user as Currently Wearing in the Previous Spectacles or Previous Spectacles Brief Element. Click the Refresh icon to refresh the data in this Element.
Note: The User cannot edit this data.
|
|
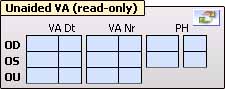
Unaided VA (view-only)
|
This Element displays the data entered in the Unaided VA Element.
Note: The User cannot edit this data.
|
|
Previous Refractions
|
This Element displays all the data entered in the Refractions Element across all of the patient's previous Encounters; in other words, it is a list of all the previous Refractions for this patient. The User can filter by Date and Method to reduce the amount of displayed data.
|
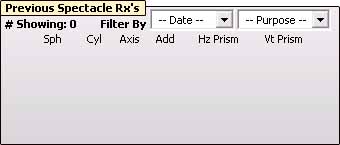
Previous Spectacle RXs
|
This Elements displays all the data entered in the Final Spectacle RXs Element across all of the patient's previous Encounters; in other words, it is a list of all the Previous Spectacle prescriptions for this patient. The User can filter by date and purpose to reduce the amount of displayed data.
|
|
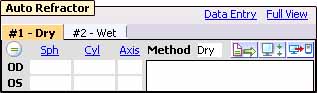
Auto Refractor
|
Use this Element to enter two Auto-refractor readings for the patient. The Method field displays as part of the tab name to differentiate the two readings.
- Data Entry link: Click to open a popup window for entering data for each auto refractor reading.
- Full View link: Click to open a popup window displaying both readings at the same time. Click the Data Entry link above the top reading to enter data for either reading.
- Copy To: Click to display a drop-down list. Select the destination to which to copy the data in the current tab.
- Import Data from Equipment: Click to import any unprocessed equipment data. For more information, see MaximEyes Equipment Interface (MEI).
- Export Data to Equipment:
 Click to export auto refractor data for the patient to third-party equipment. For more information, see MaximEyes Equipment Interface (MEI). Click to export auto refractor data for the patient to third-party equipment. For more information, see MaximEyes Equipment Interface (MEI).
|
|
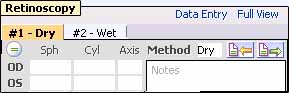
Retinoscopy
|
Use this Element to enter two Retinoscopy readings. The Method field displays as part of the tab name to differentiate the two readings.
- Full View link: Click to open a popup window displaying both readings at the same time. Click the Data Entry link above the top reading to enter data for either reading.
- Copy From:
 Click to display a drop-down list. Select the source from which to copy data into the current tab. Click to display a drop-down list. Select the source from which to copy data into the current tab.
- Copy To: Click to display a drop-down list. Select the destination to which to copy the data in the current tab.
|
|
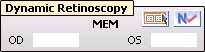
Dynamic Retinoscopy
|
Use this Element to enter the data for one Dynamic Retinoscopy.
|
|
K's
|
Use this Element to enter two K's readings. The Automatic or Manual labels display as part of the tab name to differentiate the two readings.
- Full View link: Click to open a popup window displaying both readings at the same time.
- Copy From: Click to display a drop-down list. Select the source from which to copy data into the current tab.
- Import Data from Equipment: Click to import any unprocessed equipment data. For more information, see MaximEyes Equipment Interface.
|
|
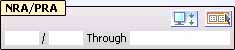
NRA/PRA
|
Import Data from Equipment: Click to import any unprocessed equipment data. For more information, see MaximEyes Equipment Interface (MEI).
|
|
Refractions
|
Use this Element to record the patient's refraction data. There is no limit to the number of Refractions that can be recorded. The Method field displays as part of the tab name to describe the data in each tab.
- Add link: Click to create a new tab.
- Remove link: Click to remove the current tab.
Note: This link only displays when there is more than one tab on the Element.
- Full View link: Click to open a popup window displaying all the refractions on one screen.
- Open Data Entry screen:
 Click to open a popup window and enter refraction data for this patient. Click to open a popup window and enter refraction data for this patient.
- Graph: Click to plot current and past Patient Encounter data on a graph. For more information, see Encounter Graphs.
- Copy From: Click to display a drop-down list. Select the source from which to copy data into the current tab.
- Copy To: Click to display a drop-down list. Select the destination to which to copy the data in the current tab.
- Clear Data: Clears all the data in the current tab.
- Import Data from Equipment: Click to import any unprocessed equipment data. For more information, see MaximEyes Equipment Interface (MEI).
- Notes: Type notes regarding the refraction data.
- Create RXs For: Select the purpose for which to create the RXs. This creates tabs in the Final Spectacle RXs Element, displaying the selected purpose. The User can select multiple purposes for the same refraction; doing this creates multiple tabs in the Final Spectacle RXs Element.
|
|
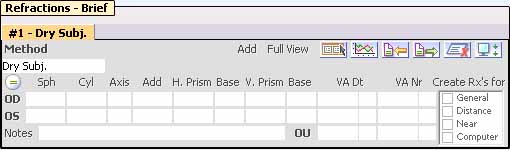
Refractions - Brief
|
This Element has the same functionality as the Refractions Element, except it consists of fewer fields.
Note: A Patient Encounter form may have either the Refractions OR Refractions - Brief Element, but it cannot have both.
|
|
Final Spectacle RXs
|
Use this Element to store the patient's Final Spectacle prescriptions data. There is no limit to the number of prescriptions that can be recorded. The Purpose field displays as part of the tab name to describe the data in that tab.
This Element is auto-populated when the user selects an item from the Create RXs For list located at the far right side of the Refractions OR Refractions - Brief Element. The User may also enter data into the Element directly by using the mouse or by clicking the Open Data Entry screen icon.
- Add link: Click to create a new tab.
- Remove link: Click to remove the current tab.
Note: This link only displays when there is more than one tab on the Element.
- Full View link: Click to open a popup window displaying all the prescriptions on one screen.
- Print link: Click to print the Final Spectacle RX in the current tab.
- Copy From: Click to display a drop-down list. Select the source from which to copy data into the current tab.
- Clear Data: Clears all the data in the current tab.
- Import Data from Equipment: Click to import any unprocessed equipment data. For more information, see MaximEyes Equipment Interface (MEI).
|
|
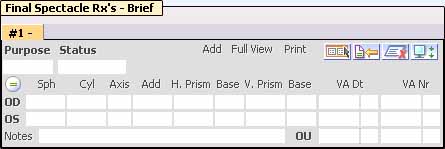
Final Spectacle RXs - Brief
|
This Element has the same functionality as the Final Spectacle RXs Element, except it consists of fewer fields.
Note: A Patient Encounter form may have either the Final Spectacle RXs OR Final Spectacle RXs - Brief Element, but it cannot have both.
|
[Top of Page]
Contact Lens Page
| Element |
Description |
|
Previous Contacts
|
Use this Element to record any contacts that the patient has worn prior to being seen by the current provider.
- After entering previous contact information, click the Evaluate link to open the CL Evaluation Details window.
- After entering data and clicking OK, a record is created in the CL Evaluations Element.
|
|
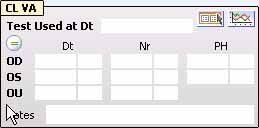
CL VA
|
Use this Element to record the visual acuities of the patient when wearing contacts.
|
|
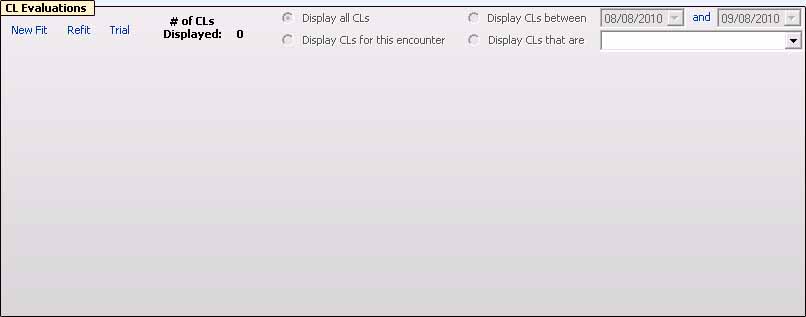
CL Evaluations
|
Use this Element to record and view all of the patient's Contact Lens evaluations across multiple Patient Encounters; in other words, it is a list of all the previous CL evaluations for this patient.
If a CL Evaluation record's status is set to Final:
- It is copied over to the Final Contact RXs Element.
- A Print link displays, allowing that CL prescription to be printed.
|
|
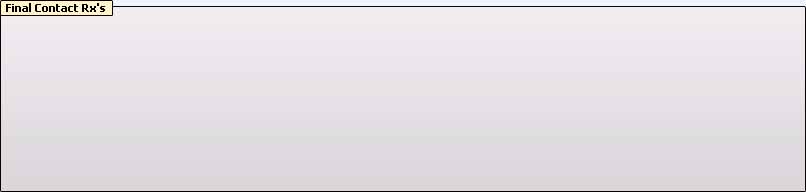
Final Contacts RXs
|
Use this Element to store the patient's Final Contacts prescriptions data. There is no limit to the number of prescriptions that can be recorded. The Purpose field displays as part of the tab name to describe the data in that tab.
This Element is auto-populated when the CL Evaluation record's status is set to Final in the CL Evaluations Element. The User may also enter data into the Element directly by using the mouse or by clicking the Open Data Entry screen icon.
|
[Top of Page]
Binocular Vision Page
| Element |
Description |
|
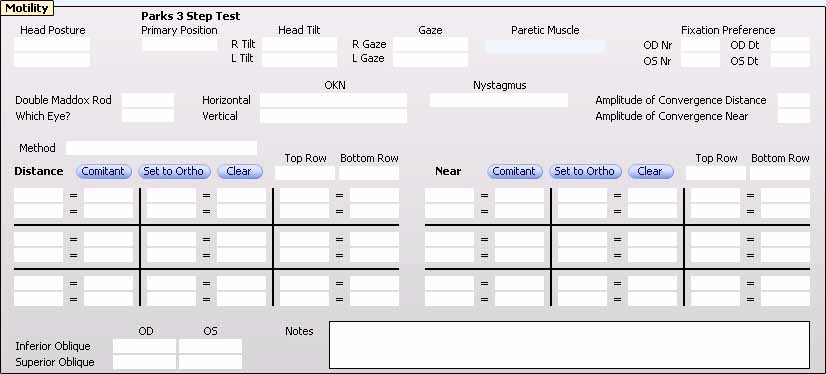
Motility
|
- Parks 3-Step Test: When the user enters values in the Primary Position, Head Tilt and Gaze fields, the Paretic Muscle field automatically calculates to the appropriate result. The Paretic Muscle field is view-only.
- Distance Tic Tac Toe Grid: For the Top Row and Bottom Row fields, select from their respective lists the appropriate labels for what the rows are being used (Aided, Unaided, Horizontal or Vertical).
- Comitant:
 Click to copy the values entered in the center section (primary position) to all other sections of the grid. Click to copy the values entered in the center section (primary position) to all other sections of the grid.
- Set to Ortho:
 Click to display select Both Rows, Top Row or Bottom Row. All the cells in the selected row are set to EX = 0. Click to display select Both Rows, Top Row or Bottom Row. All the cells in the selected row are set to EX = 0.
- Clear Data:
 Click to clear all the data entered in the grid. Click to clear all the data entered in the grid.
- Near Tic Tac Toe Grid: For the Top Row and Bottom Row fields, select from their respective lists the the appropriate labels for what the rows are being used (Aided, Unaided, Horizontal or Vertical).
|
|
Phorias
|
Import Data from Equipment: Click to import any unprocessed equipment data. For more information, see MaximEyes Equipment Interface (MEI).
|
|
Vergences
|
Import Data from Equipment: Click to import any unprocessed equipment data. For more information, see MaximEyes Equipment Interface (MEI).
|
|
NPC
|
Import Data from Equipment: Click to import any unprocessed equipment data. For more information, see MaximEyes Equipment Interface (MEI).
|
[Top of Page]
Anterior Segment Page
| Element |
Description |
|
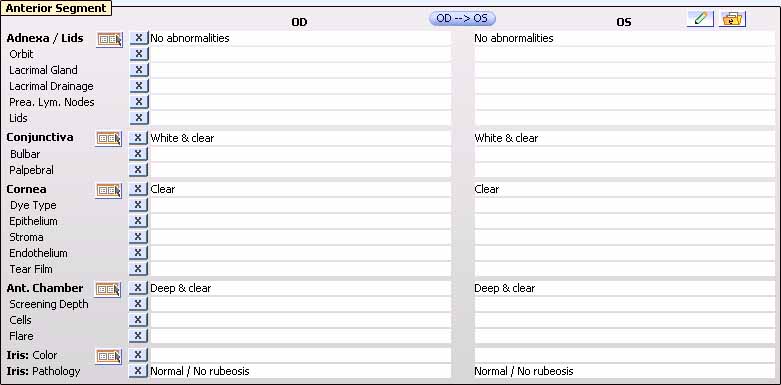
Anterior Segment
|
Each section (Adnexa/Lids, Conjunctiva, etc.) has its own Data Entry screen.
All check box lists on the Data Entry screens are multi-select; in other words, the user can check  multiple items in the same list. multiple items in the same list.
- Invoke 3D Precision Draw:
 Click to launch 3D Precision Draw. Click to launch 3D Precision Draw.
- Show eFiles:
 Click to display all eFiles associated with this patient. Click to display all eFiles associated with this patient.
- Set Normal values for this element:
 Click to auto-fill the Element with Normal values, as defined in the Encounter Elements module. Click to auto-fill the Element with Normal values, as defined in the Encounter Elements module.
|
|
Lens
|
All check box lists on the Data Entry screens are multi-select; in other words, the user can check multiple items in the same list.
|
[Top of Page]
Posterior Segment Page
| Element |
Description |
|
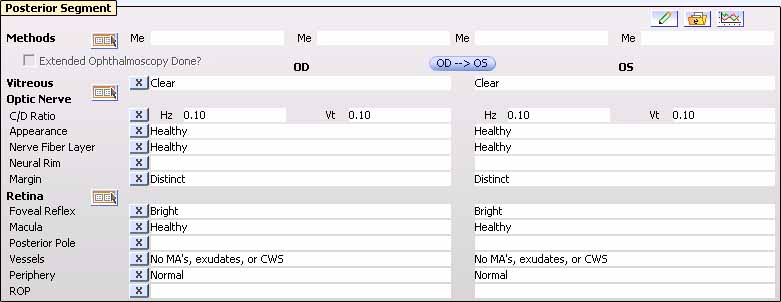
Posterior Segment
|
Each section (Methods, Vitreous Optic Nerve, etc.) has its own Data Entry screen.
All check box lists on the Data Entry screens, EXCEPT the C/D Ratio lists, are multi-select; in other words, the user can check multiple items in the same list.
|
[Top of Page]
Tests & Miscellaneous Page
| Element |
Description |
|
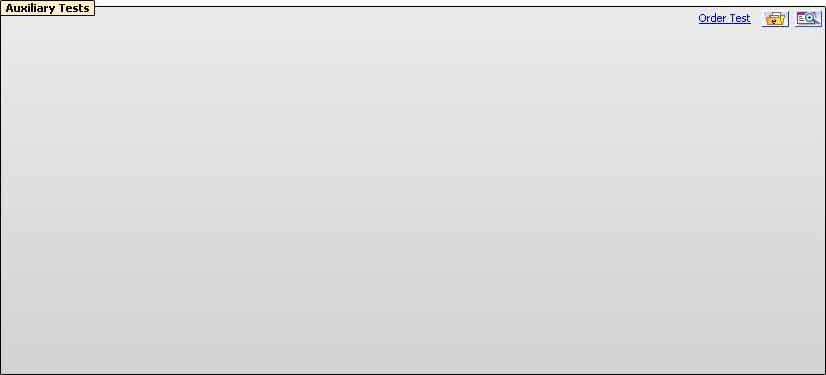
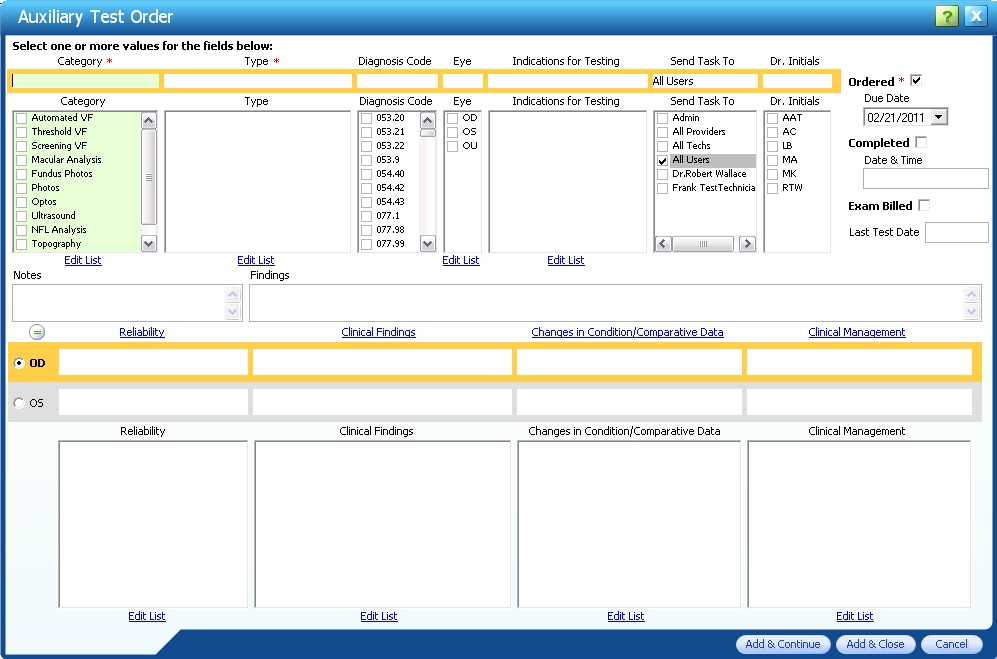
Auxiliary Tests
|
Use this Element to order additional tests for the patient, by clicking the Order Test link in the upper-right corner of the Element and entering data in the displayed Auxiliary Test Order window.
- The available values for Type, Reliability, Clinical Findings, Changes in Condition/Comparative Data and Clinical Management are dependent on the which Category is selected.
- Indicate the test is completed by checking the Completed check box. The current date and time are automatically entered.
- When either the Add & Continue or Add & Close button is clicked, a Task is created for the owner(s) assigned to the test.
eFile:  Click to launch the eFile Viewer. Click to launch the eFile Viewer.
- Displays images that are associated with the Auxiliary Tests Element for this Encounter.
- Images may be added if none are associated with the Auxiliary Tests Element for this Encounter.
|
|
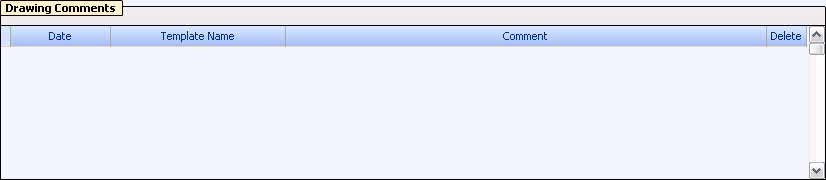
Drawing Comments
|
This Element displays the comments entered by the user in 3D Precision Draw tool. The comments can be entered on the Comments and Autotext tabs of the following 3D Precision Draw tool templates:
- Amsler Grid
- Cataracts (only Comments tab is present)
- Central Retina
- Entire Fundus
- External Eye
- Gonioscopy
- Lateral View
- Optic Nerve Cupping (only the Comments tab is present)
|
|
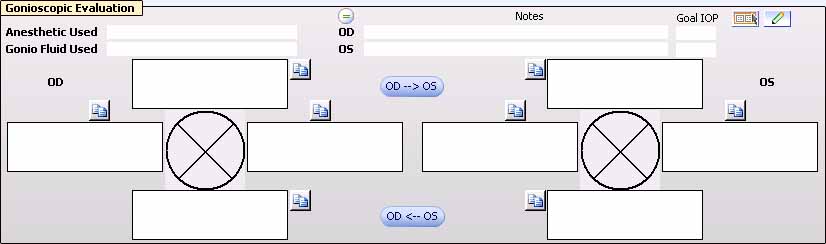
Gonioscopic Evaluation
|
Using the Data Entry Screen:
- To enter data for a specific quadrant, click the text box corresponding to that quadrant. This highlights the text box in light green and enables all the corresponding check box lists in the bottom section of the window.
All the check box lists in the bottom section are multi-select; in other words, the user can check multiple items in the same list.
- As you select values in each list, the values are appended in the highlighted text box and are separated by semicolons, except values selected in the Iris Insertion, Angular Approach and Peripheral Iris lists. These values get appended to each other without a semicolon; for example, B20b or B(A)5f.
- Use the Copy To buttons
 and and  for each quadrant to copy data from the selected quadrant to other quadrants. for each quadrant to copy data from the selected quadrant to other quadrants.
|
|
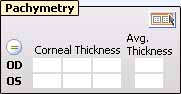
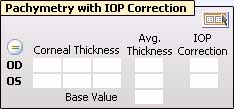
Pachymetry
|
The Avg. Thickness field is the auto-calculated average of the three corneal thickness fields.
|
Pachymetry with
IOP Correction
|
The Avg. Thickness field is the auto-calculated average of the three corneal thickness fields.
The value of IOP correction is calculated based on the value entered in the Base Value field and the following table. The default value of 540 is entered in the field when the user tabs out of the corneal thickness field.
| Corneal Thickness Value |
IOP Correction Value |
|
401-420
|
7
|
|
421-440
|
6
|
|
441-460
|
5
|
|
461-480
|
4
|
|
481-500
|
3
|
|
501-520
|
2
|
|
521-540
|
1
|
|
541-560
|
0
|
|
561-580
|
-1
|
|
581-600
|
-2
|
|
601-620
|
-3
|
|
621-640
|
-4
|
641-660
|
-5
|
|
661-680
|
-6
|
|
681-700
|
-7
|
|
[Top of Page]
Final Findings Page
| Element |
Description |
Medications for this Encounter
|
Use this Element to record new medications that were prescribed for the patient during this Encounter, as well as to indicate which medications the patient is currently taking should be continued.
- Click the E-Prescribe button
 to launch the E-Prescribe Browser to prescribe medications on the Rcopia® site. to launch the E-Prescribe Browser to prescribe medications on the Rcopia® site.
- Once finished prescribing, click the Logout link. MaximEyes SQL downloads any prescriptions that were made on the Rcopia site.
|
|
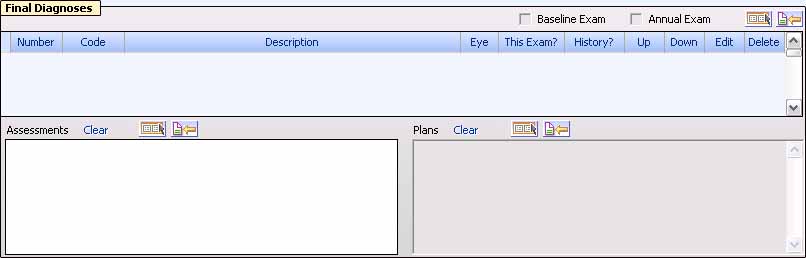
Final Diagnoses
|
Use this Element to enter the Final Diagnoses, Assessments and Plans for this Patient Encounter.
If there are Document Templates associated with any of the Diagnoses entered in this Element, the template(s) display in the Final Outbound Documents section.
Note: There is no limit to the number of Diagnoses Codes that may be entered on the Element.
- Baseline Exam: Check this box to designate this Encounter as the Baseline Encounter for the next exam. Its data is used when creating a new Encounter for this patient, the Copy Previous Encounter Data button
 is clicked, and the Baseline Exam option is selected from the displayed Copy History Data From [Name] popup window. is clicked, and the Baseline Exam option is selected from the displayed Copy History Data From [Name] popup window.
- Annual Exam: Check this box to designate this Encounter as the patient's Annual exam. The date is then recorded in the Last Annual Exam field of the Patient Record.
`
- Copy From: Click to copy the Final Diagnoses from the Previous Exam or the Previous Baseline Exam.
- Open Data Entry screen: Click this icon to display the Favorites, Final Diagnoses, Assessments and Plans data entry tabs.
- Favorites Data Entry tab:
The values in the Select Diagnoses, Select Assessments and Select Plans sections are designated either by clicking the Add to Favorite button on their respective modules in the Office Admin
 Encounter Admin menu. Encounter Admin menu.
OR
by clicking their respective Do you also want to add this diagnosis to favorites? check boxes (see each section description below).
- Select Diagnoses section: Displays the Diagnoses Codes that are marked as favorites.
- Select Assessments section: Displays the Assessments that are marked as favorites and the Assessments associated with the Diagnoses Codes selected in the Select Diagnoses box. The User may filter this list to display only the Favorite Assessments or only the Assessments associated with the Diagnoses Codes selected in the Select Diagnoses box.
- Select Plans section: Displays the plans that are marked as favorites.
- To display the complete list of options for each section, either click its respective See More button
OR
click the corresponding Main tab at the top of the Final Diagnoses - Data Entry window.
- To select an item from a section list, click the Add button.
- Final Diagnoses Data Entry tab:
Use this tab to enter Final Diagnoses for this Encounter.
Add a selected Diagnoses to the Favorites tab by clicking the Do you also want to add this diagnosis to favorites? check box on the far right of the window.
- Diagnoses (History, Code Complete and Equipment): This section displays a list of Diagnoses Codes from all previous Encounters for this patient, Codes suggested by Code Complete, and Codes that have been imported through the equipment integration.
Click the radio buttons to sort the list by various criteria.
- Copy from Previous: Click to copy Diagnoses Codes from the previous Encounter into the Final Diagnoses list in the bottom section. Duplicate Diagnoses Codes are not copied.
- Copy from Last Baseline: Click to copy Diagnoses Codes from the last Baseline Encounter into the Final Diagnoses list in the bottom section. Duplicate Diagnoses Codes are not copied.
- Sort By: Click the corresponding radio button
 to sort the Diagnoses Codes and Diagnoses Description lists by Code or Description. The default sort type is Diagnoses Code. to sort the Diagnoses Codes and Diagnoses Description lists by Code or Description. The default sort type is Diagnoses Code.
- Filter By: Click the corresponding radio button to reduce the Code and Description lists by defining filter criteria for each. For example, type a few numbers/letters to display in the check box lists only those entries that begin with those numbers/letters.
- Final Diagnoses: Displays information about each Diagnosis as it is added.
- Use the up
 and down and down  arrow buttons to re-order the list of Diagnoses. arrow buttons to re-order the list of Diagnoses.
- Each Diagnosis may be edited or deleted by clicking the corresponding buttons.
- Click the Add Patient Alert button to add the selected Diagnosis as a patient Alert to the Patient record.
- Assessments Data Entry tab:
Use this tab to enter Assessments for this Encounter. The Diagnoses that were selected for this Encounter, as well as the Findings for this Encounter, display at the top of the window as view-only reference information.
Add a selected Assessment to the Favorites tab by clicking the Do you also want to add this assessment to favorites? check box on the far right of the window.
- Several possible Assessments display to make selection faster. Any Assessments associated with a Diagnosis entered in the Final Diagnoses Data Entry tab display in the Assessments associated with the selected diagnoses tab.
- When an item in one of the check box lists is selected, it is first copied to the Assessment text box outlined in orange. When all items for one Assessment have been selected, click the Add button to copy the Assessment to the Assessments for this Encounter text box at the bottom of the window.
- Other Assessments tab: Displays various Assessments grouped by categories.
- Previous Assessments tab: Displays previous Assessments for the patient.
- Plans Data Entry tab:
Use this tab to enter Plans for this Encounter. The Assessments that were entered for this Encounter may be edited and display at the top left of this window.
Add a selected Plan to the Favorites tab by clicking the Do you also want to add this plan to favorites? check box on the far right of the window.
- Several possible Plans display to make selection faster. Any Plans associated with a Diagnosis entered in the Final Diagnoses Data Entry tab display in the Plans associated with the selected diagnoses tab. The Plans may be filtered by Diagnoses Code.
- When an item in one of the check box lists is selected, it is first copied to the Plan text box outlined in orange. When all items for one Plan have been selected, click the Add button to copy the Plan to the Plans for this Encounter text box at the bottom of the window.
- Plans may be entered for Recall in, Schedule in, and Refer to. If one of these Plans is selected, the Plan text displays as a blue underlined link in the Plan text box at the top right of the window. This indicates that this Plan is recognized as a Special Plan and is used to transfer Recall in, Schedule in, and Refer to information to the MaximEyes® Practice Management System (PMS) via the PMS integration.
- Other Plans tab: Displays various Plans grouped by categories. Recall to, Schedule in, and Refer to Plans may also be entered using this tab.
- Previous Plans tab: Displays previous Plans for the patient.
- CL Evals tab: Displays any CL evaluations that were performed as part of this Encounter.
- Medications tab: Displays any records that are on the Medication History Element or the Medications for this Encounter Element for this Encounter. For reference, any allergies that the patient has display in red on this tab.
|
|
Final Procedures
|
This Element stores the CPT Codes for this Encounter. If there are Document Templates associated with any CPT Codes entered in this Element, these automatically display in the Final Outbound Documents Element.
- Open Data Entry screen:
- Final Diagnoses: Displays all the Diagnoses Codes entered in the Final Diagnoses Element. To copy a particular Diagnosis Code to a Bill, click the Select icon.
- Procedures (from History, Code Complete and Equipment): Displays the Procedure Codes from all previous Encounters for this patient, Codes suggested by Code Complete, and any Codes that have been imported through equipment integration.
- Bill 1 Tab: Multiple Bills may be created by clicking the Add Bill link. Each Bill is sent to the MaximEyes Practice Management System (PMS) separately. Up to four Diagnoses Codes may appear on a single Bill. To add Diagnoses Codes, select from the Final Diagnoses section at the top of the window. Enter the Procedure Code by selecting the Code or Description, Units, Modifiers, Diag Ptr, and then click the Add button.
- Non-Billable Procedures tab: Use when the Procedures will not be billed to insurance or the patient. These Procedures do not export to the MaximEyes Practice Management System (PMS).
- Copy From: Click to copy the Final Procedures from the Previous Exam or the Previous Baseline Exam.
- E&M Code Checker:
 Click to display the E&M Code Checker window. Click to display the E&M Code Checker window.
- If a 99xxx code is entered in the Final Procedures grid, the E&M Code Checker opens in Validate mode.
- If no 99xxx code is entered in the grid, the E&M Code Checker opens in Suggest mode.
The User must enter the Complexity Details on the E&M Code Checker and click the Validate/Suggest button. In the case of Suggest mode, the suggested E/M Code is entered into the Final Diagnoses grid.
|
|
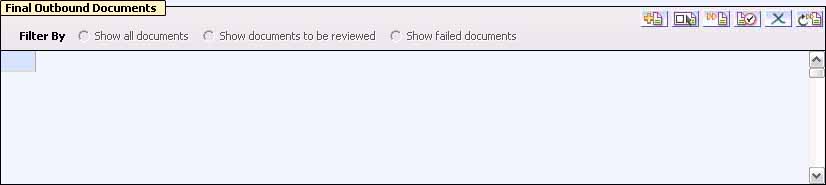
Final Outbound Documents
|
This Element stores the Documents for this Encounter.
Initially, this Element shows any Documents associated with the current Encounter Type. When Diagnoses Codes are entered in the Final Diagnoses Element or CPT Codes are entered in Final Procedures Element, any Documents associated with those Codes automatically populate in the Final Outbound Documents Element.
Click these icons on the top right of the Element to do the following to Encounter Documents:
| Icon |
Function |
 |
Add |
 |
Select All |
 |
Delete |
 |
Review |
 |
Edit |
 |
Preview |
 |
Send |
 |
Resend |
Click the Add icon to open the Add Document window and do the following:
- Add a Document
- Add Recipients for the Document
- View/modify the content of the Document
- Mark the Document as Reviewed
- Send the Document
Note: When the Patient Encounter is saved, any Documents that have not been sent and are listed in the Final Outbound Documents Element are sent. This is a preference is set in the System Preferences module.
|
 Top of Page