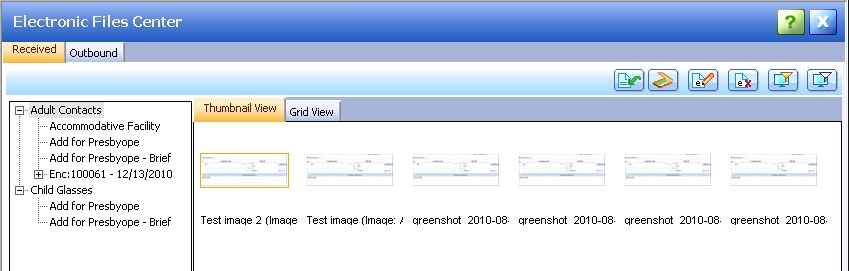
Electronic Files Center - Received Tab
This tab displays all the Electronic Files (eFiles) that have been received by the practice and are pending review, regardless of who the Reviewer or current User is.
- EFiles in the Received tab display in two different views: Thumbnail View and Grid View.
- The left section displays a navigation tree view of the Received eFiles for Patients and Encounters.
- The selected Patient or Encounter is highlighted in gray.
- The eFiles of the selected Patient or Encounter display in the right section.
Select from the following to learn more:
Secondary toolbar

This toolbar displays when either the Thumbnail View or Grid View is selected. For information about each button and the tasks it performs, click here.
Navigation tree
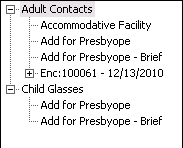
Use this tree to quickly filter the displayed patient eFiles by Category.
- Displays in both Thumbnail View and Grid View.
- The selected Patient or Encounter is highlighted in gray.
- Displays the Patient Name and list of Categories.
- EFiles associated with a Patient Encounter display as a separate group and are referenced by the Encounter number.
- To expand the list, click the Expand icon.
 To collapse the list, click the Collapse icon.
- Click a Category to display only that Category's eFiles in the Thumbnail View or Grid View.
- To re-display all eFiles in all Categories, click the Patient Name.
Thumbnail View
This tab displays thumbnail images and names of the eFiles associated with the selected Patient or Encounter.
- Displays eFile thumbnail and Name in the standard Windows Explorer® format.
- Double-click an eFile to open it in the Edit EFile popup for editing.
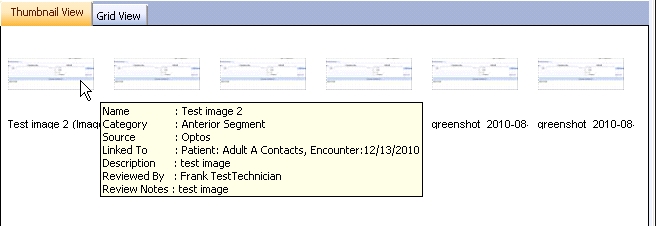
- Right-click an eFile to select View, Edit or Delete options from the context menu.
- Hover the mouse over the thumbnail to display summary information about the eFile.
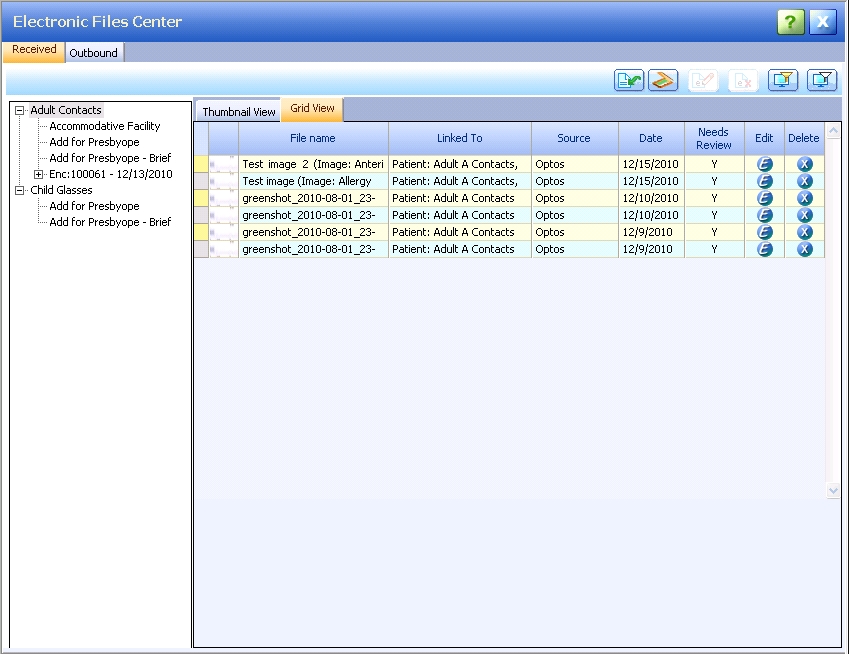
Grid View
This tab displays the eFiles for the selected Patient or Encounter in standard MaximEyes SQL grid format.
- EFiles display in descending chronological order.
- To view an eFile, click anywhere on its row, except the Edit
 or Delete
  buttons to open the View eFile popup.
- To edit an eFile, click the Edit button. The Edit eFile popup displays.
- To delete an eFile, click the Delete button.
Delete eFile in Grid View
- Click the Delete icon in the row of the eFile you wish to edit. The Edit eFile popup displays.
- A warning displays. Click the Yes button to confirm the deletion.
- The Patient eFile List updates to no longer display the deleted eFile.
- The eFile no longer displays in the Electronic Files tab (Grid View or Thumbnail View).
- Click the No button to cancel the deletion.
Secondary toolbar buttons
When an eFile is selected in Thumbnail View, all six toolbar buttons display.
When an eFile is selected in Grid View, the View or Edit Selected eFile and the Delete Selected eFile buttons do not display.
- For help on how to View a Selected eFile in Grid View, click here.
- For help on how to Delete a Selected eFile in Grid View, click here.
| Button | Function |
|---|---|

|
Import eFiles |

|
Scan eFiles |

|
View or Edit Selected eFile |

|
Delete Selected eFile |

|
Filter eFiles |
|
|
Clear Filter |
Import eFiles
- Click to display the Open dialog box.
- Browse to the desired file.
- Select the file and click the Open button. The Import eFile window displays.
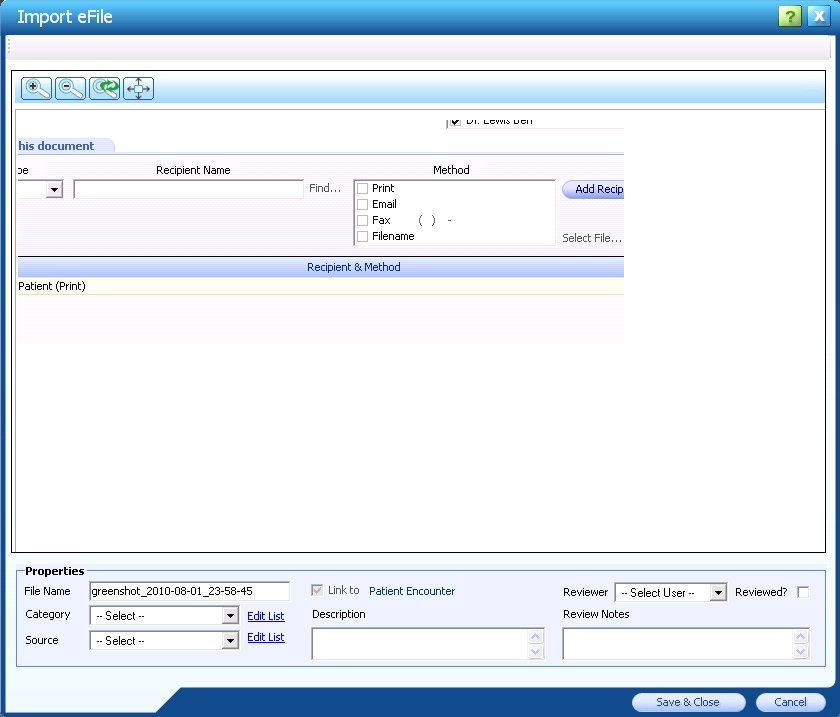
- The eFile image displays in the top section of the popup. Click the corresponding icons to:
 Zoom in
 Zoom out
 Reset eFile image to original magnification
 Display the eFile image as Full Screen
- Complete the fields in the Properties section.
- The File Name auto-populates with the name of the selected file. Enter a difference name, if desired.
- Select the Category and Source. To edit the Value List for Category or Source, click their respective Edit List links.
- Select the Reviewer and whether the eFile has been reviewed.
- Optionally, type a Description and/or Reviewer Notes.
Note: Once reviewed, the Reviewer can add additional Reviewer Notes to this field.
- To close the Import eFile popup and save changes, click the Save & Close button.
- To close the popup without saving changes, click the Cancel button.
Scan eFiles
- Click to display the MaximEyes SQL - Scanlink popup.
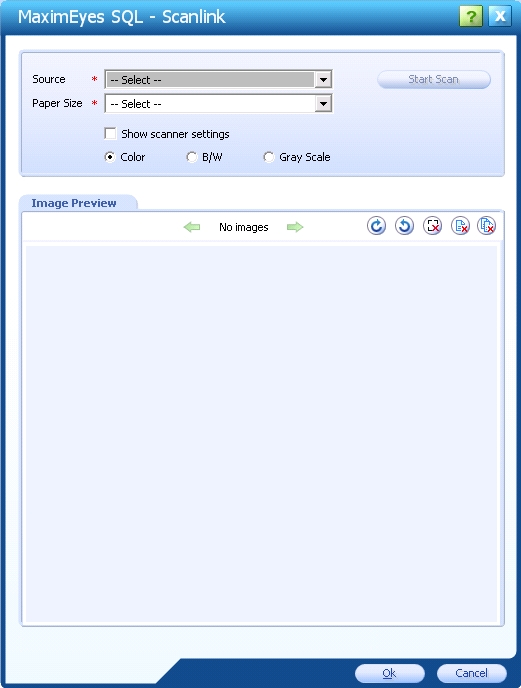
- Select the source and paper size.
- Optionally, select to show the scanner settings and/or change the default mode from color to black and white or grayscale.
- Click the Start Scan button. When complete, the scanned eFile displays in Image Preview tab.
- To save the eFile image, click the OK button. To close the popup without saving the eFile image, click the Cancel button.
View or Edit Selected eFile
Note: This icon is inactive in Grid View.
- From the Thumbnail View tab, click the eFile you wish to edit or view.
- Click to display the Edit eFile popup.
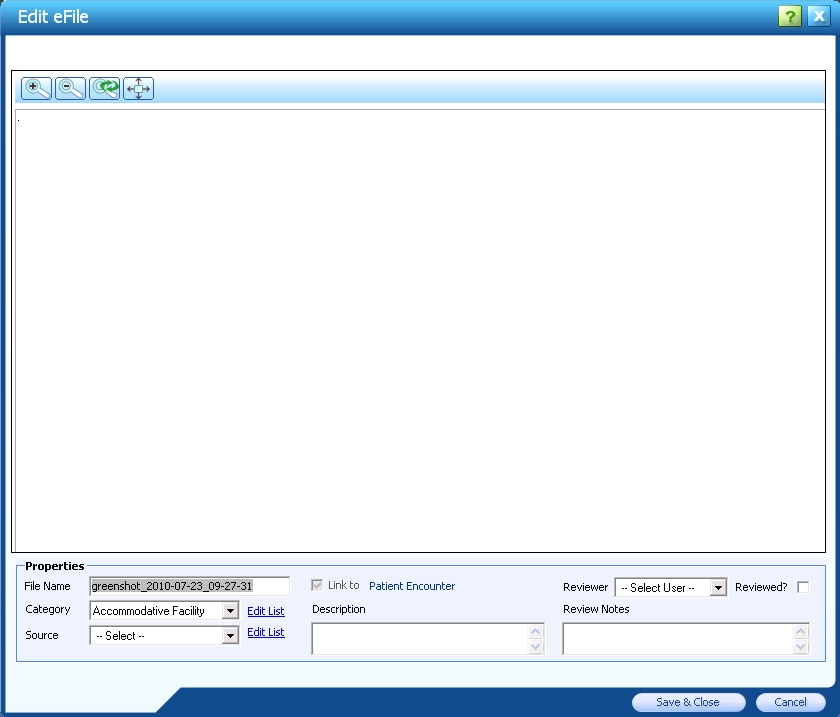
- The eFile image displays in the top section of the popup. Click the corresponding icons to:
Zoom in
Zoom out
Reset eFile image to original magnification
Display the eFile image as Full Screen
- Edit the fields in the Properties section, including the eFile name.
- To edit the Value List for Category or Source, click their respective Edit List links.
- To close the Edit eFile popup and save changes, click the Save & Close button.
- To close the popup without saving changes, click the Cancel button.
Delete Selected eFile
Note: This icon is inactive in Grid View. To delete an eFile in Grid View, click the Delete icon in the row of the eFile you wish to delete.
- From the Thumbnail View tab, click the eFile you wish to delete.
- A warning displays. Click the Yes button to confirm the deletion.
- The Patient eFile List updates to no longer display the deleted eFile.
- The eFile no longer displays in the Electronic Files tab (Thumbnail View or Grid View).
- Click the No button to cancel the deletion.
Filter eFiles
- Click to display the eFiles Filter popup.

- In the Filter By tab, select the criteria by which you wish to filter the eFiles.
- Click the OK button to filter the list. The popup closes and those eFiles that match the selected criteria display.
Note: Although those eFiles that do not match the criteria do not display, they have not been deleted from MaximEyes SQL.
- Click the Clear button to clear all selected criteria.
- Click the Cancel button to close the popup without filtering the eFiles.
Clear Filter 
- Click to clear the selected criteria from the eFiles Filter popup.
 Top of Page