MaximEyes® E&M Code Checker - Validate Mode
If an E/M Code is entered in the Final Procedures Element on a Patient Encounter, the MaximEyes® E&M Code Checker opens in Validate mode to check whether the data entered on the History and Exam Forms meets the requirements for the entered E/M Code. When the Validate Entered Code popup displays:
- The History and Exam Details display as view-only fields.
- The History and Exam Levels are determined by the E&M Code Checker display as view-only fields.
- The Complexity Details, which determine the Complexity Level, can be reviewed and changed by the user.
Note: The levels of History, Exam and Complexity are each factors in validating the E/M Code.
Description
The Validate Entered Code popup consists of several sections (described below):
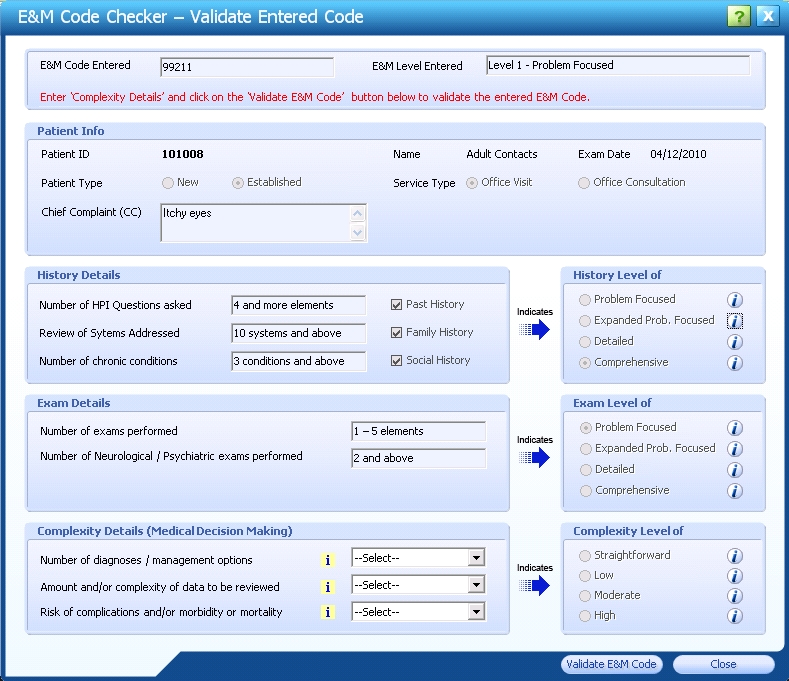
- E&M Code/Level Entered
- Displays the Code entered by the user and the corresponding E&M Level.

- Displays Help instructions in red.
- Fields are view-only.
- Patient Info
- Displays basic information about the patient, including Patient ID number, Exam Date and Chief Complaint. These fields are view-only.

- History Details
- Displays data regarding the number of Elements that have data entered in them on the History Forms (Medical, Family and/or Social).
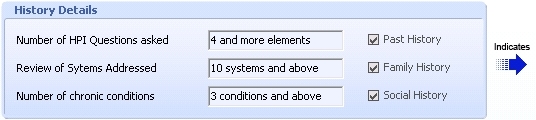
- This data determines what level of History has been performed.
- Fields are view-only.
- Values indicate the selection in the History Level of tab (displayed to its right).
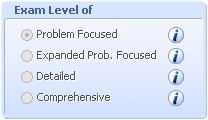
- History Level of
- Displays the value indicated by the History Details tab.

- The list of possible values are view-only.
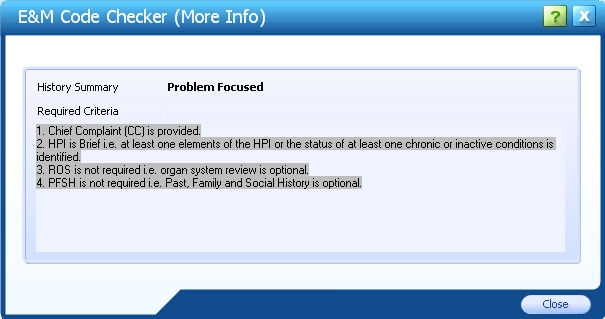
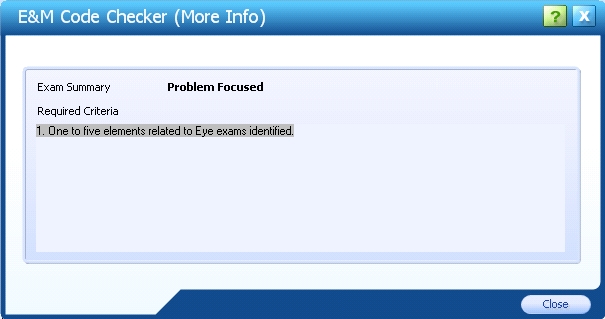
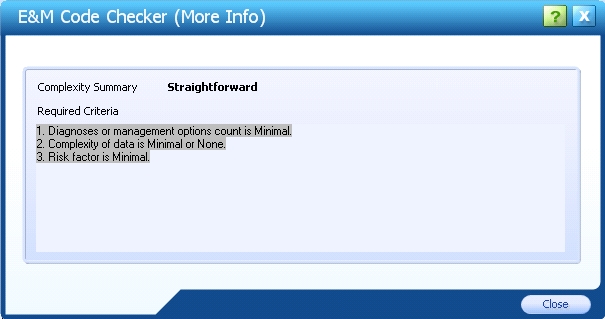
- Click the Information icon
 to the right of a value to display the E&M Code Checker (More Info) popup, which includes the criteria required to code at that level.
- Exam Details
- Displays data regarding the number of Elements that have data entered in them on the Exam Form.
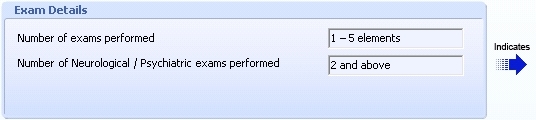
- This data determines what level of Exam has been performed.
- Fields are view-only.
- Values indicate the selection in the Exam Level of tab (displayed to its right).
- Exam Level of
- Displays the value indicated by the Exam Details tab.
- The list of possible values are view-only.
- Click the Information icon to the right of a value to display the E&M Code Checker (More Info) popup, which includes the criteria required to code at that level.
- Complexity Details (Medical Decision Making)
- Displays user-selected values.
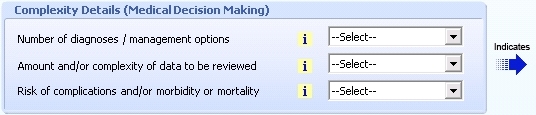
- The selections made here determine the Complexity Level of the Encounter.
- Use the drop-down lists to make selections for each field.
- Hover the cursor over the yellow Information icons
 to display further information about on what each field value is based.
- Values indicate the selection in the Complexity Level of tab (displayed to its right).
- Complexity Level of
- Displays the value indicated by the Complexity Details (Medical Decision Making) tab.
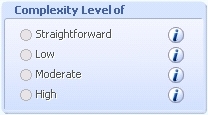
- List of possible values are view-only.
- Click the Information icon to the right of a value to display the E&M Code Checker (More Info) popup, which includes the criteria required to code at that level.
Using the E&M Code Checker in Validate Mode
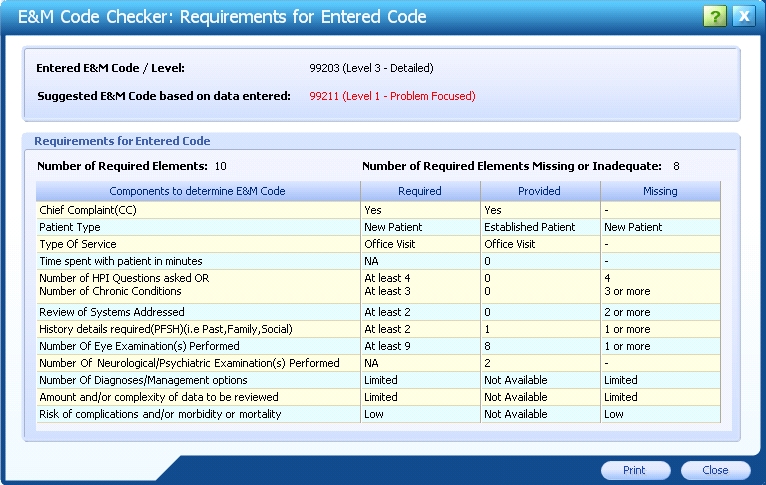
When the Validate E&M Code button is clicked, the Requirements for Entered Code popup displays.
The upper section displays the following data:
- Entered E&M Code / Level: The E/M Code entered by the user, followed by the Level number and brief description in parentheses.
- Suggested E&M Code based on data entered: The E/M Code calculated by the E&M Code Checker, followed by the Level number and brief description in parentheses. This information displays in red.
The lower section displays the details about the required criteria for the entered Code, as well as how many required Elements are needed and how many are met.
If the data entered on the Exam and History Forms:
- Is less than what is required for the entered E/M Code:
The Entered E&M Code and Suggested E&M Code do NOT match, indicating that the documentation requirements have not been met for the selected E/M Code. If the documentation meets the requirements of an E/M Code of a lower level, that lower-level code displays.
The Requirements for Entered Code section displays detail on the Number of Required Elements and the Number of Required Elements Missing or Inadequate.
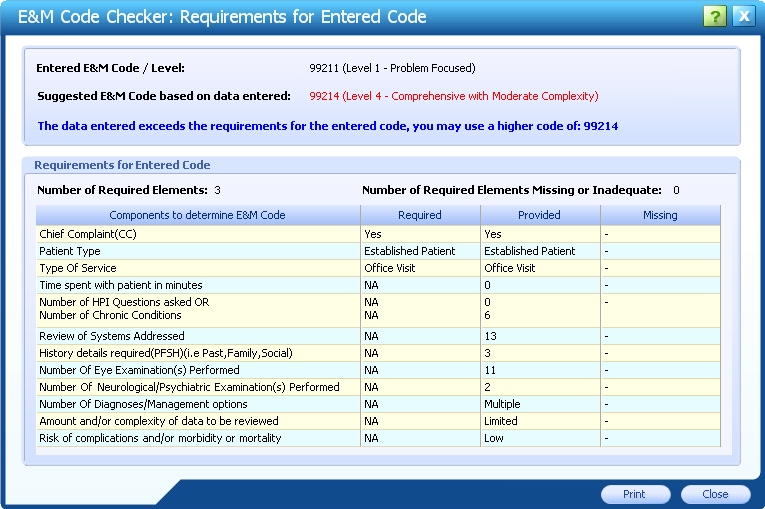
A message displays in blue, stating the data entered exceeds the requirements for the entered Code and suggests the higher Code that may be used.
- Is more that what is required for the entered E/M Code:
The Entered E&M Code and Suggested E&M Code do NOT match. The documentation requirements have been met for the selected E/M Code; however, if the documentation meets the requirements for a higher E/M Code, that higher-level Code displays.
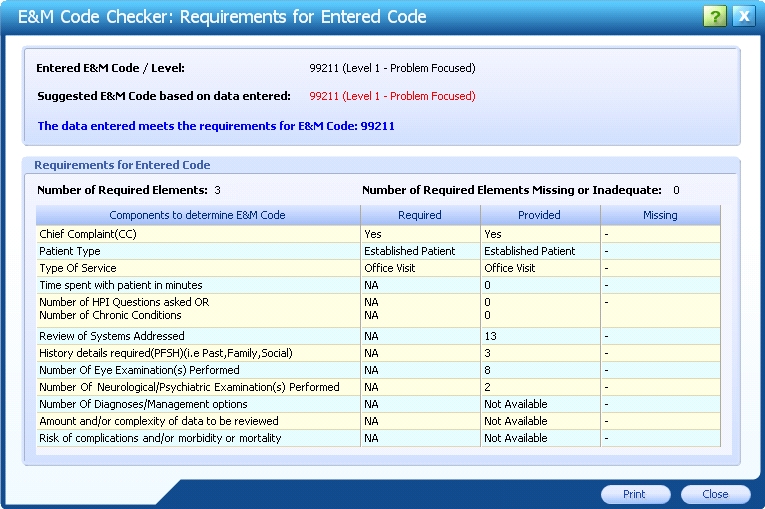
- Is appropriate for the entered E/M Code:
The Entered E&M Code and Suggested E&M Code DO match, indicating the documentation requirements have been met for the selected E/M Code.
A message displays in blue, confirming the data meets the requirements for the entered E/M Code.
Validate the E/M Code
- Click the Validate E&M Code button to validate the E/M Code. The Requirements for Entered Code popup displays the following information:
- Entered and suggested Code.
- Whether the entered Code meets the requirements.
- The Requirements for the Entered Code details.
- If the entered Code meets the requirements, click the Close button.
- The popup closes and the Validate Entered Code popup displays.
- Note: The Print function is currently not available.
- Click the Close button on the Validate Entered Code popup. The window from which you opened the E&M Code Checker displays.
- Click the Save button to save the Patient Encounter.
If the entered code does not meet the requirements
- From the Requirements for Entered Code popup, make note of which required Elements are missing.
- Click the Close button.
- The popup closes and the Validate Entered Code popup displays.
- Note: The Print function is currently not available.
- Click the Close button on the Validate Entered Code popup. The window from which you opened the E&M Code Checker displays.
- Enter the required information for the appropriate Elements.
- Open the E&M Code Checker and validate the entered Code.
- When the Code is successfully validated, close the Validate Entered Code popup.
- The Validated Code is entered in the Final Procedures Element of the Encounter.
- The window from which you opened the E&M Code Checker displays.
- Click the Save button to save the Patient Encounter.
 Top of Page